Sunday, November 30, 2008

Getting Tor, Privoxy and Torbutton working on Ubuntu

This was tested on my laptop running Ubuntu 8.04 (Hardy Heron).

1. From a terminal run
sudo apt-get install tor privoxy

2. Edit /etc/privoxy/config
3. Add the line (including the period at the end):
forward-socks4a / localhost:9050 .

4. Comment out the line:
logfile logfile

5. Restart Privoxy:
sudo /etc/init.d/privoxy restart

6. Install the Firefox torbutton extension.

Right clicking the torbutton and selecting Preferences | Proxy Settings | Test settings should work out of the box now.

Thursday, November 13, 2008

The best thing I've read all day

Interoperability, transparency, extensibility, and storage or transaction economy: these are the important themes in designing file formats and application protocols. Interoperability and transparency demand that we focus such designs on clean data representations, rather than putting convenience of implementation or highest possible performance first.

From The Art of Unix Programming.

Free (as in beer) PDF to Word Conversion

Normally I try to avoid talking about my job here (this is my personal blog and nothing on it is attributable to my employer) but I want to make an exception in this case.

The company I work for (Solid Documents) just launched a free PDF to Word conversion service.

Usually when I'm at home I have to fire up a VM running Windows (and Solid Converter PDF) to convert a file (I typically convert to RTF as our software doesn't require MS Office for that conversion), but now I don't have to (and neither do you). Nice.

Wednesday, November 12, 2008

Stupid (but useful) one liner for Visually Monitoring Free Disk Space

I'm sure there is a better way of doing this (or a prebuilt tool that does) but I felt like doing some oldschool shell scripting while I update my local Ubuntu mirror for Intrepid Ibex.

One liner:
while true; do clear; date; df -ah; sleep 10; done

The output looks like:
Wed Nov 12 20:10:43 PST 2008
Filesystem Size Used Avail Use% Mounted on
/dev/hda1 72G 49G 20G 71% /
tmpfs 506M 0 506M 0% /lib/init/rw
proc 0 0 0 - /proc
sysfs 0 0 0 - /sys
procbususb 0 0 0 - /proc/bus/usb
udev 10M 44K 10M 1% /dev
tmpfs 506M 0 506M 0% /dev/shm
devpts 0 0 0 - /dev/pts
/dev/hdb1 459G 59G 377G 14% /var/spool/apt-mirror

Monday, August 25, 2008

Ping a range of IP addresses using Python (or whatever else you need to do)

#!/usr/bin/env python
#
# IPRange. Do stuff with IP addresses.
#
# this is code is designed to parse a range of ip addresses and
# do something with them. Example uses are ping, nmap, ssh, etc.
#
# have fun, but don't do illegal things and if it breaks everything
# around you it isn't my fault. Use this only for good, not evil.
#
# contact author(Sam Levine):
# host = darkscyon
# domain = geemail.com (you know, google mail)
# no spam or complaints please. patches are welcome. feedback
# (good or bad) is very welcome.
#
# Be excellent to one another.

def IPRange(octets, func=""):
# octets = "192.168.50-55.1-100"
# func = (some function you've written)
# objects passed to func are strings

if func == "":
def func():
pass

octets = (octets.split('.'))
ranges = []
loop = 0
for octet in octets:
# this is ugly
# basically the idea is that if the user enters a range of ip
# addreses delimited by '-' it parses out the first part of the
# range and the second part.
# it works, just not pretty or readable
if octet.find('-') != -1:
spot = octet.find('-') + 1
octets[loop] = int(octet[:octet.find('-')])
ranges.append(int(octet[spot:]) + 1)
else:
octets[loop] = int(octet)
ranges.append(int(octet) + 1)
loop += 1
CurrentAddress = ""
loop = 0
output = []
for one in range(octets[0], ranges[0]):
for two in range(octets[1], ranges[1]):
for three in range(octets[2], ranges[2]):
for four in range(octets[3], ranges[3]):
for item in (one, two, three, four):
CurrentAddress += str \
((one, two, three, four)[loop]) + "."
loop += 1
CurrentAddress = CurrentAddress[:-1]
output.append(func(CurrentAddress))
CurrentAddress = ""
loop = 0
# return a list of the output
return output

if __name__ == '__main__':
import os
# self test code
def func(x):
print x

test = IPRange("192.168.1-2.10-15", func)
print "The output should be none", test

# example usage
def pinger(x):
input, output = os.popen4('ping -c2 ' + x)
return output
pinglines = IPRange("192.168.1.1-254", pinger)
for streams in pinglines:
for line in streams.readlines():
print line,

Wednesday, August 13, 2008

A python script to find and play all the videos on your computer

#!/usr/bin/env python
#
# a silly script I wrote to find and play
# all the movies on my hd.
#
class FileLister:
def __init__(self, suffixes, directory=None):
self.suffixes = suffixes
if directory:
self.cwd = directory
else:
self.cwd = os.getcwd()

def list_files(self):
list = []
items = os.listdir(self.cwd)
for item in items:
for suffix in self.suffixes:
if item.endswith(suffix):
list.append(item)
return list

def change_dir(self, directory):
self.cwd = directory

def change_filter():
pass

def walk_dir(self):
movies = []
for root, dirs, files in os.walk(self.cwd):
self.change_dir(root)
list = self.list_files()
if list:
for item in list:
movies.append(os.path.join(root, item))

return movies

class MoviePlayer:
def __init__(self, movie_list, player='vlc'):
self.player =[player]
self.mlist = movie_list

def play(self):
command = self.player
for movie in self.mlist:
command.append(movie)

subprocess.call(command)

if __name__ == "__main__":
import os, subprocess, time
# replace the magic string below with the location you store your videos
dir = os.path.expanduser('/media/storage')
# you may wish to edit the list below to add filetypes you use
lister = FileLister(['.avi', '.mpg', '.flv', '.mkv'], dir)
movies = lister.walk_dir()
movies.sort()
# mplayer can be substituted with gmplayer or left out to use
# vlc by default
playme = MoviePlayer(movies, 'mplayer')
playme.play()

Wednesday, July 30, 2008

My current python "IDE"

The script below is one that I'm currently using to quickly setup my python coding environment.
#!/usr/bin/python
import os
os.popen4('gnome-terminal -e python --working-directory ~/scripts/python -t PYTHON')
os.popen4('gnome-terminal --working-directory ~/scripts/python')
os.popen4('xterm -e "cd scripts/python && /bin/bash"')
os.popen4('firefox http://docs.python.org/ http://www.pygtk.org/pygtk2tutorial/index.html')

You may be asking yourself why I'm opening 3 terminals. I personally like having lots of text in front of me at once so I can focus on reading/thinking and not using the mouse (or the keyboard).

Xterm is there because it is really really fast. Gnome-terminal is there due to it's superior copy/paste support (I grew up on Windows, sue me).

Saturday, July 12, 2008

determining your visible IP address using perl and whatipmyip.com

A while back Ashish Shukla put together
a great hack for using perl an whatismyip.com to determine your IP address. My modified version of this is below:
#!/usr/bin/perl -w
#whatismyip.pl - This script uses http://www.whatismyip.com/ service.

use LWP::Simple;
use strict;

my $url = "http://www.whatismyip.com/automation/n09230945.asp";

my $content = get($url);
print "$content\n";

Monday, June 30, 2008

fun with nmap

I had some fun with nmap today.

Should you care to see some of the horrible pipe-fitting I did please see the commands below:
nmap -A -vv 192.168.1.1-254 > nmapoutputwithosdetection.txt  
grep "open port" nmapoutputwithosdetection.txt | awk '/[0-9]+\.[0-9]+\.[0-9]\./ {print $6}' | \
sort -u > iplisttoscan.txt
nmap -T sneaky -iL iplisttoscan.txt
What does this do? nothing productive whatsoever really. I wanted a script to go through and determine the hosts up on my local network, then simulate someone being "sneaky" when using nmap so I could watch the scan using tcpdump (note to self: start using a better sniffer like wireshark).

Sunday, June 15, 2008

my .fluxbox/keys file

Although I love gnome and kde, they are are both way too heavy for my EEE PC 4G 700. Speed is extremely important on a device with limited cpu power, more so on a mobile device (hence why putting Vista on a UMPC is insane). My choice for a window manager on my EEE PC is Fluxbox. It is easily configurable (with a little reading) and is very responsive, even on slower hardware.

Below is the contents of my .fluxbox/keys file, hopefully someone will get something out of seeing it.

OnDesktop Mouse1 :HideMenus
OnDesktop Mouse2 :WorkspaceMenu
OnDesktop Mouse3 :RootMenu
OnDesktop Mouse4 :NextWorkspace
OnDesktop Mouse5 :PrevWorkspace
# 100 = left 102 = right 61 = / 98 = up 104 = down
Control Mod1 100 :PrevWorkspace
Control Mod1 102 :NextWorkspace
Control Mod1 61 :ToggleDecor
Control Mod1 98 :MaximizeWindow
Control Mod1 104 :Exec gnome-do
Mod1 F1 :Workspace 1
Mod1 F2 :Workspace 2
Mod1 F3 :Workspace 3
Mod1 F4 :Workspace 4
Mod1 F5 :Workspace 5
Mod1 F6 :Workspace 6
Mod1 F7 :Workspace 7
Mod1 F8 :Workspace 8
Mod1 F9 :Workspace 9
Mod1 F10 :Workspace 10
Mod1 F11 :Workspace 11
Mod1 F12 :Workspace 12
Control Mod1 f :Exec firefox
Control Mod1 t :Exec xterm
# turn on bluetooth and connect to my n75
Control Mod1 i :Exec gksu netz
# turn off bluetooth
Control Mod1 n :Exec gksu nonetz
Control Mod1 p :Exec pidgin
Control Mod1 c :Exec gcalctool
Control Mod1 k :Exec conky
Control Mod1 e :Exec FBReader
Control Mod1 0 :Exec gksu /etc/init.d/networking restart
Control Mod1 9 :Exec gksu ifconfig ath0 down
Menu :RootMenu

Friday, May 30, 2008

Projects I'm currently working on (or will be soon)...

1. Creating an Ubuntu mirror.

2. Building a Squid Web Cache Server.

3. Installing OpenWrt on my Linksys router.

4. Reading O'Reilly books on OpenSSL, LDAP Administration and Kerberos.

Wednesday, May 14, 2008

Setting up FirePGP on Ubuntu 8.04 (In 5 seconds)

Although I found several guides for installing GnuPG and FireGPG (on Ubuntu no less) I didn't find anything that put all the instructions together in one place.

Below are the steps needed (at least at my end) to set up FireGPG on Ubuntu 8.04. It's really more of an overview (and it takes more than 5 seconds), but it should be helpful in getting you where you need to go.

If you don't know what FireGPG is, you really don't need to be here. Just know that unencrypted e-mail is like unprotected sex :)

Please don't do anything crazy; if following these instructions blows up your computer it isn't my fault. :)


Setting up FirePGP on Ubuntu 8.04

1. Open a terminal and run:

sudo apt-get install gnupg gpa

2. Run gpa from the terminal. Follow the on screen prompts to create a key. If you cannot do this you should be administering another operating system.

3. Install FireGPG:

Click here.

Click Download | Allow | Install. Restart Firefox.

4. Restart Firefox when prompted. Go to gmail you should be able to encrypt and decrypt your e-mail.

Enjoy!

Tuesday, April 29, 2008

Using Perl to Improve Poor Spelling


#!/usr/bin/perl
#
# written by sam levine (hn darkscyon dn gmail tld com)
# this software comes with no warranty. it may blow up your computer. you have been warned.
# this code is licensed under the GPL.
# this is some random code I was playing with to better grasp regular expressions
# I will improve it at some point (comments, actually working, etc.), for now feel free to
# have fun with it if you are so inclined.
#
#
sub clean {
my $input = $_[0];
print "problem text = $input\n";
$input =~ s/(.*)/\L\1/;
$input =~ s/(.*)/\u\1/;
$input =~ s/\bliek\b/like/ig;
$input =~ s/\bpwn/defeat/ig;
$input =~ s/\bteh\b/the/ig;
$input =~ s/z(o|0)r\b/ing/ig;
$input =~ s/(!|\?)(!|\?)+/\1/ig;
$input =~ s/kthank?x+/thank you/ig;
$input =~ s/\bwit\b/with/ig;
$input =~ s/\bbiye+/bye/ig;
$input =~ s/\bomg\b/exclamation/ig;
$input =~ s/\breall+y\b/really/ig;
$input =~ s/\bu\b/you/ig;
$input =~ s/\br\b/are/ig;
#print $input;
return $input;
}


while (<>) {
$output = &clean($_);
print $output;

}

Monday, April 28, 2008

Windows (Vista or XP) is actually fine, it's the lack of good 3rd party apps that kills it for the home user

Thanks to lifehacker for putting together such a good list of 3rd party software to use on Windows:

http://lifehacker.com/384545/superior-alternatives-to-crappy-windows-software

The reason why I love Ubuntu (and Linux in general) is that you can install most of the equivalent apps with a single command line operation. This alone would keep me using Ubuntu, even if I ended up buying a Macbook Pro.

Microsoft: Stop making crappy apps and bundle the good stuff with your OS (or make it easy to install them). Small groups of hackers have made great software that they give away for free. Help out your customers and help them get it without having to be nerds.

Sunday, April 27, 2008

Perl To Blogger


#!/usr/bin/perl
#
# perltoblogger
# written by Sam Levine (hn darkscyon dn gmail tld com).
# this may blow up your computer. use it at your own risk.
# this code is licensed under the GPL.
#
# This script is designed to convert perl scripts into code that can
# be posted into
# blogger with a minimum of fuss
# it does not create full html (if it did I would call it
# perltohtml), rather it creates code within
# <pre></pre> tags that may be posted as code snippets
# on blogger (or a forum, or a mediawiki wiki, etc.)
#
# Useage: perltoblogger [InputFile] > OutputFile.html
# Example: perltoblogger myperlfile > myhtmlfile.html
#
# thanks to http://www.w3schools.com/tags/ref_entities.asp for the
# list of ASCII entities
# thanks to http://bguide.blogpost.com/2008/03/html-entities.html
# for showing me how to be less of a noob.
# thanks to everyone involed in making perl.
#
print "<pre>\n";
while (<>) {
s:&:&amp;:g;
s:<:&lt;:g;
s:>:&gt;:g;
s:':&apos;:g;
s:":&quot;:g;

#s:<:&lt;:;
print;
}
print "</pre>\n";

Wednesday, April 23, 2008

a study aid for the Linux+ exam: perlreadsome (Man Pages)

While I was studying for my Linux+ exam I was unable to
find a utility to cycle through all the administrative
man pages on my computer. I wrote the script below for
this purpose.

At some point I may put it up on sourceforge (by that
time it might even work on a non-ubuntu linux computer)
, but for now I just wanted it off of my eee pc before
I blow it away and install Ubuntu 8.04 on it.


#!/usr/bin/perl
#
# Perl Read Some (Man Pages) version 0.01
#
# this script was written by sam levine (hn darkscyon dn
# gmail tld com).
# it come with NO WARRANTY at all. it is licensed
# under the GPL (Gnu Public License)
# I am a noob programmer. this may make your computer
# explode. YOU HAVE BEEN WARNED.
#
# what this script is designed to do:
# Enable you to study man pages.
#
# while I was studying for my Linux+ test I read man
# pages a lot to prepare.
# doing so was a pain in the arse. I decided to write
# this script for fun,
# and hopefully to help other people prepare for the
# test (this may be helpful for
# the LPIC tests as well.

#
#@pages = qw[ man ls ping fdisk ifconfig ];
print "create the manlist? (press y then enter)
\n"; # this creates the list of pages to read
chomp($wait = <STDIN>);
if ( $wait eq 'y' ) {
open MANLIST, "> manlist.sav"; #
# this overwrites any file named manlist.sav in the
# same folder as the script.
select MANLIST;
print ""; #clear manlist.sav
close MANLIST;
select STDOUT;
print "cleared the manlist.sav file\n";
# user feedback is important


@input = `ls /usr/share/man/man8/`; # create an
# array with all the admin man pages
# need to determine the location of this
# and make it portable.

foreach (@input) {
s/[\.]+.+$//;
# remove everything after the . in the file name
open MANLIST, ">> manlist.sav";
select MANLIST;
print; # add the page to the file
close MANLIST;
select STDOUT;
}
print "Just made the manlist.sav file.
Press Enter to continue\n"; # I love feedback ;)
chomp($wait = <STDIN>);
}

open MANLIST, "manlist.sav";

foreach $item (<MANLIST>) {
push(@pages, $item); # create an array with all
the pages in the manlist.sav file
}

# print "$pages[1]\n";
# print "$pages[2]\n";
# print "$pages[ -1 ]\n";

#$page = 'man';
foreach $page (@pages) {
#$maning = `man $page`;
system "man $page"; # read the man page
#print $maning;
push(@pages, $page);
# copy the first item to the last item
shift @pages; # remove the first item
print "\nCare to quit?
please press q then enter\n";
chomp($wait = <STDIN>);
if ( $wait eq 'q' )
{
print "saving the manlist\n";
open MANLIST, ">manlist.sav";
select MANLIST;
print ""; # clear manlist.sav
open MANLIST, ">>manlist.sav";
select MANLIST;
# recreate the manlist.sav file with the new organized list of pages
foreach $page (@pages) {
print $page;
}
close MANLIST;
select STDOUT;
last;
}

}

Tuesday, April 1, 2008

Overclocking my eee pc 701

As much as I like using Ubuntu on my eee pc, I find it to be a little on the slow side when compared to the easy mode version of Xandros (their description, not mine) that the laptop ships with.

Due to this I decided to "overclock" the device back to the speed it was supposed to ship at (900mhz). Doing this will reduce your battery life and can completely destroy your eee pc, even if you do it correctly. Please don't complain if your device gets borked while doing anything mentioned in this post, this is hacky stuff.

I've had good results with the kernel module written by kiwidrew:

http://forum.eeeuser.com/viewtopic.php?id=9797&p=1

After following the instructions to download install the kernel module in the above link, I put together the script below to overclock the eee:

sh -c 'echo 85 24 1 > /proc/eee/fsb'
echo "FSB overclocked to 85MHz"
sleep 2
sh -c 'echo 90 24 1 > /proc/eee/fsb'
echo "FSB overclocked to 90MHz"
sleep 2
sh -c 'echo 95 24 1 > /proc/eee/fsb'
echo "FSB overclocked to 95MHz"
sleep 2
sh -c 'echo 100 24 1 > /proc/eee/fsb'
echo "FSB overclocked to 100MHz"

I named the script oc, made it executable (chmod +x) and copied it to /usr/local/bin.

I can overclock the eee by running sudo oc. I've been using it for a good month without any stability problems, so today I decided to make it start automatically.

To do so I made a link to it using the command below:

sudo ln -s /usr/local/bin/oc /etc/init.d/oc

I made it start automatically by running the command below:

sudo sysv-rc-conf --level 2 oc on

With any luck you'll have an overclocked eee that will be slightly faster than before. You should check the content of /proc/eee/fsb to make sure it's really running at 100 Mhz (the cpu speed is 9 times this, 900 mhz).

Thanks to Kiwidrew for writting an awesome kernel module!
Sunday, March 30, 2008

The 10 immutable laws of being pro

1. In order to become pro you must read the manual.
2. You must be a noob in order to become pro.
3. Being pro at one thing does not make you pro at all things.
4. Being pro today does not mean that you will be pro tomorrow.
5. Just because someone is pro does not mean that you should listen to them.
6. Just because someone is a noob does not mean that you should ignore them.
7. Knowing your weakness is being pro.
8. Using your strength is being pro.
9. Being lazy is being pro.
10. Working hard is being a noob.

Tuesday, February 26, 2008

Disable the Show Repairs Message in Word 2007

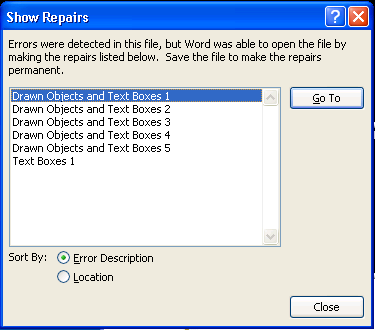
When using Word 2007 to open a damaged Word DOC, you may encounter the popup window below:


Although it's nice to know that errors were detected in this file, but Word was able to open the file by making the repairs, this can get tiresome if you have to work with a lot of damaged files.

Should you want to disable this popup from appearing, you can do so by opening your Registry Editor and performing the steps below.

Please note that editing your registry can prevent your computer from booting. Follow the steps below at your own risk:

1. Open the registry editor and browse to:

HKEY_CURRENT_USER\Software\Microsoft\Office\12.0\Word\Options

2. Create a new DWORD value and name it:

BulletProofOnCorruption

3. Set the value to:

1

4. Now when you open a corrupt file you should not see the Show Repairs popup window.

References:

Thanks to Microsoft for this tip.